Being able to grow your own cannabis is as much about creativity and resourcefulness as it is about cultivating quality cannabis plants. For DIY enthusiasts, crafting your own cannabis growing equipment not only saves money, but also allows for complete customization tailored to your unique needs.
Join us as we walk through creating essential parts of your cannabis grow setup, including DIY cannabis drying chambers, cannabis trellis, grow tents, and more.
DIY cannabis trellis
A trellis provides structural support for your cannabis plants, encouraging upward growth and ensuring more even light exposure. Whether you’re growing indoors or outdoors, a custom cannabis trellis can easily be tailored to fit your space and plant size needs.
Materials needed:
- PVC pipes, wooden stakes, or bamboo poles
- Twine, zip ties, or garden netting
- Scissors or utility knife
Instructions:
- Build the frame: Assemble your trellis frame using PVC pipes or stakes. For indoor grows, be mindful to design the frame to ensure it fits within your grow space.
- Attach netting or twine: Secure the netting horizontally across the frame, creating a grid with spaces wide enough for your cannabis plants to grow through. If using twine, be sure to tie it tightly to the frame in a similar grid pattern.
- Position the cannabis trellis: Place the trellis above or around your plants, adjusting the height as the plants continue to grow.
- Train your cannabis plants: As your plants grow, gently guide their branches through the trellis to help encourage even growth and better light exposure.
Pro tip: Install the cannabis trellis early in your plant’s growth cycle to minimize stress when training branches.
DIY cannabis grow tent
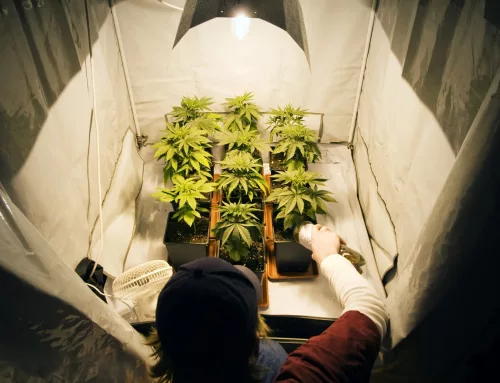
It’s surprisingly not difficult to learn how to make your own grow tent. A grow tent is an essential piece of equipment for indoor cannabis cultivation, providing a more controlled environment for light, temperature, and humidity. Building your own grow tent can allow you to save money while also creating a more custom setup in the long run.
Materials needed:
- PVC pipes or wood for framing
- Reflective material (ex. Mylar or emergency blankets)
- Duct tape and Velcro
Instructions:
- Assemble the frame: Use PVC pipes or wooden planks to construct a rectangular frame, ensuring it is sturdy enough to hold your lights and ventilation equipment.
- Wrap the frame: Cover the entire frame with reflective material, securing it with duct tape. Reflective surfaces ensure your plants receive even light distribution.
- Create openings: Cut openings for access, ventilation, and wiring. Attach Velcro to the access points for easy entry.
- Install cannabis growing equipment: Set up your ventilation system (exhaust and intake fans) and hang grow lights from the frame.
Pro tip: Use weatherstripping around the other openings to ensure the grow tent is lightproof, which is critical, especially during the flowering stage.
DIY cannabis planter box
Custom planter boxes allow you to control the size, drainage, and soil environment of your cannabis plants, making them ideal for growers looking to optimize their setup or beginners seeking out a simple first DIY project.
Materials needed:
- Untreated wood planks
- Screws, nails, and a drill
- Plastic lining or landscape fabric
Instructions:
- Measure and cut the wood: Decide on the dimensions you’d like for your cannabis planter box and cut the wood planks accordingly.
- Assemble the box: Use screws or nails to attach the planks together, forming a rectangular box.
- Line the box (Optional): Add a layer of plastic or landscape fabric inside the base of the box to help retain moisture while also allowing drainage.
- Add drainage holes: Drill small holes in the bottom of the box or create a gravel layer to prevent waterlogging.
- Fill with soil: Use a high-quality, nutrient-rich soil mix designed for cannabis.
Pro tip: Elevate the box slightly by adding legs to improve drainage and reduce your risk for pests.
DIY cannabis drying chamber
Drying cannabis properly is a foundational step that helps to ensure your buds are fully ready for curing. A drying chamber helps regulate factors such as airflow, humidity, and temperature – allowing your cannabis to dry evenly, while also preventing mold.
Materials needed:
- A large cardboard box or storage container
- String or mesh racks
- Small fan
Instructions:
- Choose a box: Select a sturdy cardboard box large enough to accommodate your cannabis harvest. The box should be clean and free of any potential contaminants.
- Set up drying lines or racks: If using string, stretch it tightly across the box and secure it on both ends to create hanging lines. Alternatively, insert mesh racks for laying cannabis buds flat.
- Hang up or lay cannabis buds down: Once you’ve cut your cannabis into manageable branches – hang them upside down from the strings, or spread smaller buds evenly on your racks.
- Position the drying chamber: Place the box in a dark, well-ventilated space where the temperature remains around 55-65°F and humidity is 50–60%.
- Add gentle airflow: Use a small fan positioned outside the box to encourage airflow without blowing directly onto the cannabis buds.
Pro tip: Check your drying cannabis buds daily for any potential signs of mold or overly rapid drying. Note that proper drying typically takes 7–10 days.
DIY cannabis curing jars
Curing cannabis is a crucial step that helps enhance the flavor, potency, and longevity of the flower you grow. A proper curing setup can ultimately create a more stable environment where cannabis buds can mature slowly, preserving their terpenes and cannabinoids.
Materials needed:
- Mason jars with airtight lids – new or used from a thrift store
- Hygrometer packs (62% humidity recommended)
- Small humidity sensors
Instructions:
- Clean your mason jars: Start by thoroughly washing and sterilizing the mason jars to eliminate any contaminants that could potentially affect your cannabis. Let them air dry completely before moving on to the next steps.
- Add cannabis buds: Gently place your dried cannabis buds into the jars. Avoid overpacking, as the buds will require space to allow for proper air circulation.
- Insert hygrometer packs: Place a single hygrometer pack in each jar to maintain optimal humidity (around 62%).
- Seal the jars: Secure the lids tightly to create an airtight environment.
- Monitor humidity and temperature: Use small humidity sensors to check the internal conditions of the jars daily.
- Burp the jars: For the first week, open the jars once daily for 10–15 minutes to release excess moisture. After the initial week, burping can be reduced to once every few days.
Pro tip: Keep your cannabis curing jars in a cool, dark place to protect the cannabinoids and terpenes from degradation due to light and heat.
Grow your own with Happy Valley Genetics
Crafting your own DIY cannabis grow setup not only saves money but also deepens your connection to the cultivation process. From curing setups to grow tents, these DIY projects can let you tailor your setup to your specific needs, goals, and interests – but you can’t get growing without the right cannabis seeds.
From high-quality feminized autoflower seeds to photoperiod seeds – start your new or next grow with premium cannabis seeds from Happy Valley Genetics. Available in a variety of strains and quantities for cannabis growers of all experience levels.


